Author Archives: Serge

A Traitor’s Gamble

« Back to the list of all Whitevale collectibles

Guide

  1. On ground, close to couple of Exile Drill Bots and Digbots, surrounded with a junk pile, Palerock Wilds.
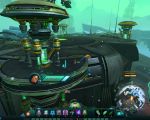
  2. On a table, with red, holographic top, bellow tent roof, close to NPCs like Scientist Pomi Vrizz and Researcher Finazzi Vrizz, Sunderstone Watch.
  3. On a small, circular, metal junk piece, close to a house with a closed door, next to a small lamppost, close to a flame cached ground, Sunderstone Hold.
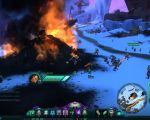
  4. On scorched ground, next to a crashed, yellow machine on fire, in the area where Traggis the Colossus group quest objective mob is, Palerock Wilds.
  5. On a small, rectangular, wooden table inside of the first larger Abandoned XAS Research Cave room you can enter. Entrance to the Abandoned XAS Research Cave is just west from the tale location marked at map. You can find DATACUBE ENTRY: Deadly Reaction at its start.
  6. Inside tiny tent, next to a small campfire with couple of inmates nearby, Deadrock Prison.
  7. On a big, burning mound with prisoners next to it, next to a road going southwest from Palerock Post to a lake.
  8. On the northern ledge on the Eldan platform east of Camp Virtue. It’s next to a big Eldan generator.
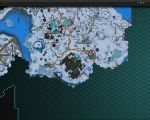
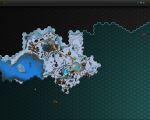
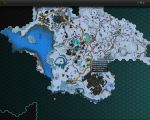
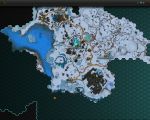
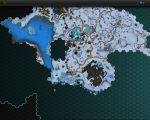
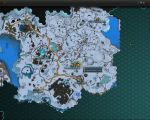
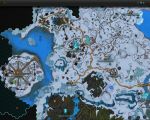
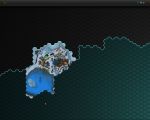
Map

Whitevale

Whitevale

1.
A Traitor’s Gamble

2.
A Traitor’s Gamble

3.
A Traitor’s Gamble

4.
A Traitor’s Gamble

5.
A Traitor’s Gamble

6.
A Traitor’s Gamble

7.
A Traitor’s Gamble

8.
A Traitor’s Gamble

Lore

Captain Caeson Aurelius stood on the bridge of his flagship, the Radiant, his command screen dominated by the swirling, red planet of Quorin Prime. The Dominion armada had found its prey. Outnumbered and outgunned, the battered rebel fleet of the traitorous Serrick Brightland, his previous commander and mentor, clustered together on the far side of the planet.

Brightland was using a classic tactic: hiding his fleet in the gravity well of the planet. It was a maneuver Caeson knew well, one he had learned
from Brightland himself. After their last skirmish, the rebel fleet was in desperate need of repairs, but Caeson had tracked them down before they were able to complete them.

On Caeson’s command, coruscating weapons-fire lit up the skies, systematically wearing down the enemy’s shields. As the Exiles struggled to return fire, Caeson watched a crippled ship decay from orbit, trailing fire as it fell toward the planet’s surface. The timing was perfect. Victory was inevitable.

The Exiles began their
retreat, and the Dominion pursued them. Aurelius knew that the planet’s gravity well made jumping to hyperspeed impossible, and the empire’s attack ships would be well in range before the rebels could reach safe distance.

But just as Aurelius prepared to target the fleeing vessels, Brightland turned his warship and set a course directly for the Radiant itself.

Aurelius’s armada unleashed every battery and cannon it had in response, engulfing the approaching ship in ghostly zero-g flame. Behind it,
Exile starship spindrives flashed one by one, leaving their leader alone and undefended. Brightland’s suicidal maneuver had saved the remaining rebel ships, but his imminent death would mean an end to their pathetic rebellion. Caeson’s armada could easily hunt down rebel stragglers once this final deed was done.

Despite taking heavy damage, Brightland’s ship relentlessly continued its collision course with the Radiant. Caeson unleashed his full arsenal on approaching ship, destroying its few remaining
defenses. In the midst of the violent barrage, Aurelius received an incoming call: Brightland was hailing him.

The image of his mentor appeared on the command screen. He was obviously wounded, leaning heavily upon his ship’s navigation console, coughing and spitting blood.

“This is not over… Aurelius.”

The Dominion captain stoically regarded his old friend and mentor, burying the visceral pain caused by his betrayal.

“It is for you, traitor.”

Chunks of hull plating flew from the two
ships as they hurtled toward impact. Aurelius ordered his men to stay the course, prepared to die in order to ensure Brightland’s death. But just before the two ships collided, the rebel warship jumped into hyperspace and was gone.

Aurelius cried out in rage. The traitor’s desperate gamble had worked.

Furious, Caeson Aurelius swore an oath. His family would not rest until they had eliminated the last vestiges of Brightland’s traitorous rebellion, even if it took them a thousand years or more.

Quick Facts

A Traitor's Gamble

Faction: Dominion

No. of Collectibles required: 8

Type: Tales from Beyond the Fringe

The Temple of Dak-Buun

« Back to the list of all Whitevale collectibles

Guide

  1. Tale is located near wrecked “ship’s hull”, on a black surface, in Fortune’s Fool.
  2. Tale can be found on the ground, beside two opened, wooden boxes, and a purple “antenna”, in Redmoon’s Dockyard.
  3. Tale is hidden on a small, wooden platform, positioned above Rimewater River. There is also a boat next to the platform. This boat carries passengers to Skullcano.
  4. On ground, next to a small rock, with green grass and many mushrooms top, close to Darkice Scratcher creatures, Darkice Village.
  5. On ground, near to a barb wire fence, Dominion NPC Shatterforce Infantry and a cannon, southwest from a nearby pond, Inception’s Stand.
  6. On ground, bellow small, crashed space ship, next to a Mutated Soldier creature, Blasted Fields.
  7. On the western shore of a frozen lake, east of Synergy Station, near stacked boxes and a barrel.
  8. Lying on a wooden box, next to a pile of more boxes and barrels, just as you cross a bridge southwest of Wigwalli Village.
  9. Southwest of Inception’s Stand, lying on a data board located between the outer eastern wall section and a rock. Directly across Broken Bike Vendor who gives you Road Kill.

Map

Whitevale

Whitevale

1.
The Temple of Dak-Buun

2.
The Temple of Dak-Buun

3.
The Temple of Dak-Buun

4.
The Temple of Dak-Buun

5.
The Temple of Dak-Buun

6.
The Temple of Dak-Buun

7.
The Temple of Dak-Buun

8.
The Temple of Dak-Buun

9.
The Temple of Dak-Buun

Lore

Far-Trader Diki crept into the dim subterranean chamber. He was in the legendary Temple of Dak-Buun, where no Lopp had ever walked before.

Raising a glowstick, he studied the chamber. Upon the far wall, there was a vibrant painting of a fantastical blue spirit, surrounded by kneeling Lopp, with inset gems appearing to rain down upon them. The floor leading up to the painting was a complex grid of colorful tiles.

Sensing a trap, Diki inched forward. He had already survived the Corridor of a Thousand K
nives, the Chamber of Flame, and the Labyrinth of Whirling Blades. One false step, and he was certain something bad would happen.

He scrutinized the floor tiles. They formed a pattern he had seen long ago on the ancient Tapestry of Raatha-Shugg, woven to display the stars of Lagos. But which tiles were safe? Of course! Those that represented the constellation of Oonga, Hunter of Shinies! His tiny Lopp feet danced across the floor, bouncing from one safe tile to the next. Soon he was across the room, sta
nding before a massive, ornate archway.

Suddenly, the chamber echoed with the sound of heavy footsteps. Like many Lopp, he was never without his faithful kurg, Shaggy, and the bulky beast had somehow managed to follow him into the temple. Looking back, Diki saw the curious kurg poking his snout into the chamber.

“Shaggy, no!” he shouted. “Room is dangerous. Very, very dangerous!”

Diki took cover as the kurg crashed into the room. Its big paw stomped on several tiles, and the walls shook. Diki da
shed through the archway, hoping that Shaggy would survive the trap and follow him into the next chamber.

Diki turned to see the room behind him collapse violently. Shaggy was nowhere to be seen! Sadness overwhelmed the tiny Lopp, but he couldn’t turn back now.

Ahead of him, illuminated by a single shaft of light, was the prize he sought. The shiniest of shinies. The iridescent pearl known as the Relic of Dak-Buun! Still grieving for his lost friend, he approached it, hoping against hope that the le
gends were true. With a trembling paw, he rubbed its surface.

A brilliant light suffused the room, and a magnificent spectral entity rose from the pearl. The legendary spirit Dak-Buun!

“FINALLY! I AM FREE! I WILL THANK YOU BY GRANTING ONE WISH!”

Diki fell to his knees. “Dak-Buun!” he implored. “Diki beseeches you! More than fame or fortune or shinies, Diki wants one thing. Diki wants his beloved kurg back!”

The room shook with a thunderous rumble. He looked back to see Shaggy wriggle his way ou
t from under a pile of rubble. Barreling forward, it gleefully knocked Diki to the ground.

“My kurg!” Diki shouted. “Shaggy lives!”

“YOUR WISH HAS BEEN GRANTED!” intoned Dak-Buun.

“Very, very good!” said Diki.

Dak-Buun beamed with joy. “AND MY WISH HAS BEEN GRANTED! AS WE ARE TRAPPED HERE, I NOW HAVE SOMEONE TO TALK TO FOR ETERNITY!”

As the light of his glowstick began to fade, Diki contemplated his next adventure: escaping from the legendary Temple of Dak-Buun!

Quick Facts

The Temple of Dak-Buun

No. of Collectibles required: 9

Type: Tales from Beyond the Fringe

Subject 33

« Back to the list of all Whitevale collectibles

Guide

  1. You can spot the Tale on the ground, near control consoles, with a totemic signs. It’s close to the lake in South Whitevale area.
  2. You can find the Tale on the ground, next to a long tent, in Doomtide Village.
  3. You can find the Tale on top of a green, round plateau, on a higher floor of Augment Facility X426.
  4. On a table, inside tall house, just behind NPC Prosperity Junction Outfitter (Arcane Vendor), Prosperity Junction.
  5. On snow, close to a Colossal Gronyx creature, Southwestern Whitevale.
  6. Just bellow a small platform with Silverscale Dreadnaught on, Southern Silverscale Station Area. This is the area where you can find Prime Gillsting. He is a “Primal Powers and Triton’s Dread” quest objective mob.
  7. In water, eastern part of Calmwater Lake, close to a river mouth.
  8. Southeast of Shiphand: Rage Logic, southeast of the crossroads, between a road and a metal fence.
  9. On the southeastern ledge on the eastern platform, Augment Facility X426.

Map

Whitevale

Whitevale

1.
Subject 33

2.
Subject 33

3.
Subject 33

4.
Subject 33

5.
Subject 33

6.
Subject 33

7.
Subject 33

8.
Subject 33

9.
Subject 33

Lore

Subject 33 woke up in a tank full of fluid. He reflexively thrashed, kicking as though he was drowning. Oxygenated fluid seeped into his lungs. 33 struggled to breathe, drifting in a haze of fear and adrenaline.

Cloudy memories drifted past: hunting in Whitevale, a flash of light, and a long, cold darkness.

33 couldn’t recognize the murky forms stalking past his transparent tank. As his eyes adjusted, he could see spacesuits and helmets. He drifted to the edge until he could barely make out a face. B
ehind its visor, it methodically gnashed rows of razor-sharp teeth.

The murky fluid conducted sounds from outside the tank. His long Aurin ears perked up. Footfalls marched past, as he strained to hear his captors’ cold, clinical voices.

“Evaluation: adrenaline levels exceed parameters.”

“Suggestion: remove brain stem for further analysis.”

Subject 33 started kicking the side of the tank.

“Observation: subject of limited intelligence. Panic reflex. Prepare first experiment.”

They had go
ne and done something very foolish.

“Confirmation: first intelligence experiment begins now.”

They had put an angry esper in a tank full of water.

33’s mind screamed. Outside the walls, a massive psychokinetic fist pounded the floor, and the walls of his tank shattered. Shards of glass blasted out in every direction. Surging fluids gushed out of the tank, as his captors struggled to stay upright.

He leapt out feet first, smashing into the nearest creature’s translucent helmet. Spiderweb crack
s formed on the surface. As he prepared for his next leap, he looked his enemy in the eye. He could almost see fear. Almost.

One by one the wasp-waisted humanoids slowly turned to evaluate him. One creature slowly reached for its weapon, and the Aurin furrowed his brow. Would they stun him? Was that an electroprod? That gave him an idea.

Subject 33 leapt to a hatch on the wall, grabbed the valve that opened it, and held on. With a thought, he hurled a psychic blade across the room, connecting with
an electrical panel. A sparking metal box dropped to the ground. Hip-deep in water, his captors twitched like ragdolls shaken in a dagun’s mouth.

33 spun the valve until the hatch opened and tumbled through. Straight ahead, red lights flashed in a long corridor. Through an aperture at the far end, he could see outside. Blue sky. White clouds. Calm waters. Freedom.

Subject 33 ran. Turrets in the walls and ceiling rained fiery death, missing him by inches. The Aurin ran faster.

A calm, alien voice
made a stern announcement over an intercom. “Observation: Aurin subject escaping.” 33 took in a deep breath of fresh sea air as he leapt toward the aperture.

Steel shutters dropped. The exit slammed shut. He fell to the ground.

The voice returned. “Verification: performance test concluded. Capture and prepare for vivisection. Subject 33 may still be of use to the Ikthian Empire.”

Blades flashed. The lights went out. The experiment continued.

Quick Facts

Subject 33

No. of Collectibles required: 9

Type: Tales from Beyond the Fringe

Captain Lairdell’s Log, Entry #1

« Back to the list of all Shiphand Missions collectibles

Lore

It’d be an understatement to say that this has been a really crappy week.

The cargo we picked up at Vespa was contaminated with… something. No one seems to know what, only that it makes folks sick. I mean, really sick. Doc Cordwain seems to think he can cure it with the medical supplies we have on board. That’s probably the best news I’ve had all day.

Quick Facts

Type: Journal

Captain Lairdell’s Log, Entry #2

« Back to the list of all Shiphand Missions collectibles

Lore

There’s a slight problem with Doc Cordwain’s plan.

You see, Ensign Bardlet’s locked himself in the med bay. He won’t come out, and he’s overridden the security protocols. Bardlet’s convinced that he’ll become infected and end up dead – or worse – if he lets us inside.

If I can’t convince Bardlet to open the med bay, things are only going to get more severe. And if he does let us in, I’ll probably shoot him on general principles for being such a moron.

Quick Facts

Type: Journal

Captain Lairdell’s Log, Entry #3

« Back to the list of all Shiphand Missions collectibles

Lore

Bardlet’s still in there, and sick folks have started dying. What’s worse, the infection seems to create some kind of alien parasite. You die, you burst, and out comes a terrible alien THING.

I’m not feeling real well. I’m pretty sure I’m a carrier now. I begged Bardlet for help, but he ignored me. He’s not sick, so he must’ve used some of our med supplies on himself. The greedy bastard’s going to come through this without a scratch, mark my words… unless the things get in there and tear him up.

Quick Facts

Type: Journal

Captain Lairdell’s Log, Entry #4

« Back to the list of all Shiphand Missions collectibles

Lore

I can feel it moving inside me. I should’ve stayed on Gateway… a nice, cushy office job, no aliens, no nutty ensigns… oh, well.

Doc Cordwain is dead. I killed the thing that crawled out of him, but there are more… so many more. The ship’s systems are functioning erratically. The containment shields aren’t stable.

I’m not going to let this thing kill me. I’ll kill myself, first. Seems to be the best way to go, anyway. Cordwain’s death was… unpleasant.

Navigator forgive me, and damn Bardlet to the void!

Captain Lairdell, signing off.

Quick Facts

Type: Journal